When it comes to communicating from the underwater world, video is #1. Yes, I’ll agree that photos are more readily consumed, just a click, no slow internet lagging, etc… but to really share the experience, video rules supreme. The next step in this, for a more immersive experience is of course 360 “spherical” video.
The world of UW 360 video has been a bit of a challenge, from domes that are too small and close for an unmodified Gopro to focus on, to the loss of FOV thanks to the water, and on top of it all, the constant risk of flooding for added entertainment value. Even the manufacturers who _want_ to offer underwater options for their 360 cameras find themselves creating imperfect solutions. KeyMission and new Garmin offering market themselves as ‘waterproof’ but as far as I have seen, footage won’t stitch without some kind of external housing. Kodak made a very pretty Dual Camera underwater housing system, but again, close but no cigar (loss of FOV from the small dome ports means 3 cameras are needed). Samsung’s UW housing has yet to make it to market for realz. The next level up, the expensive options such as Abyss – from either manufacturer – are still troubled by the dome port/focus issue and cameras need either a diopter for the close focus or a wrench to modify their focus distance. Otherwise blurry footage is still the name of the game.
I think that somewhere along the way the decision was made for us that ‘the wow factor will be enough to distract from soft focus’. I disagree, especially for a system that will cost the user over 10k. I want f’ing beautiful footage for my $$ if i’m buying a commercially available product, period. And I KNOW beautiful, crisp, sharp underwater 360 is possible, look no further than the Green Island, Taiwan video that I repeatedly share as an example. Yes, now more mfgs are coming around, we have the Boxfish and the VRTUL1 but these are both WAY out of my price bracket for passion projects like OceanLab 360.
If you are here, reading this, you’ve likely been following my consumer camera + DIY underwater housing or equivalent adventures. The three options so far that come in under $2000 (and substantially less if you are willing to be patient on eBay) are the Theta bubble with 30′ max rated depth, Samsung Gear 360 (either) in DIY housing made with Telesin domes, and the 3 camera array mount from Sebastian Hagemeister available from Shapeways that is used with 3 Kodak Pixpro SP360 4k’s and their stock UW housings.
Now that we have the ability to capture stitchable, in focus underwater footage it is on to the next challenge. My dream all along was to come up with a system that would allow me to stream 360 video to kids of all ages wearing a HMD (Head Mounted Display) and experience the underwater world along with me as if they were my dive buddy, and maybe even be able to ask questions (either live or relayed via a tender).
So how to do this? Well, if you want it done bigly you could hire the folks at VRTUL and they’ll bring in the big guns (literally) but this is not really a solution for my application, an affordable, scalable option for low budget educational projects.
Enter DiverLaura’s random fabrication on the kitchen table.

A few months back, when the 360bubble housings were backordered, it turned out my educational project cohort in crime and Women Divers Hall of Fame SeaSister Drey Stockert was kind enough to send me her theta bubble housing. I wasn’t about to take a drill and dremmel to someone elses kit so had a slight delay whilst waiting for a second base to arrive. Once it arrived it was time to get down to business.
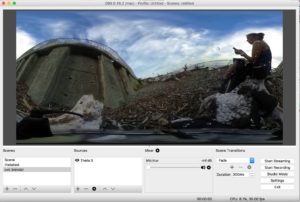
With previous tests, it became clear that the fastest way to get us some streaming 360 would be the Theta S run through OBS (Open Broadcast Software) which meant i needed to figure out how to utilize a longer USB cable. Since the Theta bubble has a max rating to 30′, I opted for the 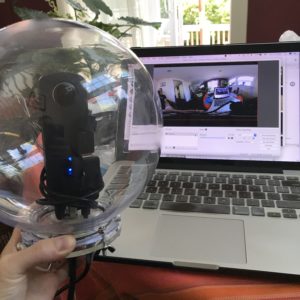 32′ Active USB cable mostly because i was a bit lazy and didn’t want to have to pot the active component if it was in the middle of the cable length, but that is a totally viable option if you want longer. With testing I found that the Active (repeater?) end needs to be furthest away from the computer, which meant I’d have to make a larger hole in the housing base, but still fully feasible. Of note, the Theta S can be a bit picky about what Micro USB cables it likes but i found this one works well AND has a right angle connection
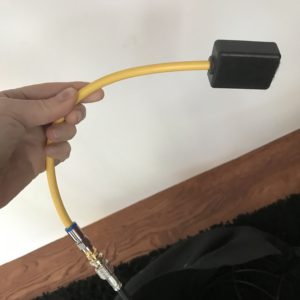
When it comes to Wifi ‘antenna’, coax sucks and what you need is a long piece of 3G-HD-SDI cable the connections on the ends don’t really matter that much as you’ll be removing one or both. You can get bulk cable, just make sure to get reasonable quality if you want to stream more than 40′.

So to make this all work together, you will need some comfort level drilling and dremmeling Acrylic.

 And a bit more comfort using Epoxy (I use 2 ton flowmax)
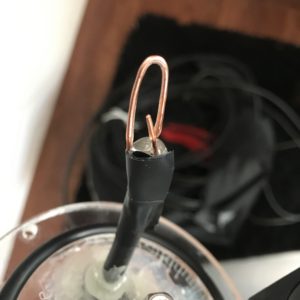
You will also want to strip the ‘inside’ wire, remove the shielding (so it can pick up the wifi signal) and Pot it a bit (so that the delicate copper wire doesn’t break off)
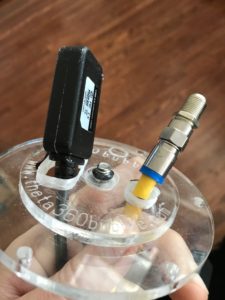
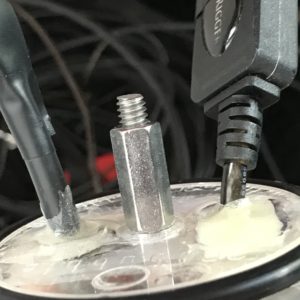 So that you can plug your right angle micro USB into the base of the Theta S you will need some kind of extension. I made this out of a 1/4 X 20 short coupling nut and a short piece of 1/4-20 X .75 threaded rod that can then be glued into the coupling nut for a short extension that is narrow enough to not impeded access to USB port. For other cameras that have shorter form factor such as the VYU360 or 2016 Samsung Gear360 you will find these adaptors work well to get your camera eye near the center of the sphere (or close enough to work) For a few bucks more you can get a black anodized version which would negate the need for black gaffing tape to reduce reflection from silver metal adaptors.
 Next fun and games is actually testing your system
 making sure it doesn’t leak AND everything transmits
Once you are comfortable with the integrity of your potting and sealing, it is time for some open water tests!

Being that this post is already too long, I’ll save the nuts and bolts of getting the stream out to the world for next time. The purpose of this post was to show the very basics of installing the transmission cables into a 360bubble housing.
On the phone side for the transmission, for streaming with wifi signal, I utilize the Cam-Do Solutions ‘dry wifi antenna’ (borrowed from my periscope gopro Hero4 streaming kit) but you could get the same result with DIY solution of stripping and potting the topside end as well, because if you take a peek inside the black box, its just some bare wire potted in resin as well 🙂